Completing the second tutorial section

In completing the second section of the TwinkleBearDev tutorial, they pose an exercise for the reader: given an image to small to fill the background, how do we tile the background such that the image fills the available area? My solution was to use SDL_QueryTexture to get the width and height of the image and then, in a set of nested for loops, render the image as many times as necessary to fill the screen.

[pastacode lang=”cpp” manual=”%20%20%20%20SDL_RenderClear(renderer)%3B%0A%0A%20%20%20%20int%20bW%2C%20bH%3B%0A%20%20%20%20SDL_QueryTexture(background%2CNULL%2CNULL%2C%26bW%2C%20%26bH)%3B%0A%20%20%20%20for%20(int%20i%20%3D%200%3B%20i%20%3C%20SCREEN_HEIGHT%3B%20i%20%3D%20i%20%2B%20bH)%0A%20%20%20%20%7B%0A%20%20%20%20%20%20%20%20for%20(int%20j%20%3D%200%3B%20j%20%3C%20SCREEN_WIDTH%3B%20j%20%3D%20j%20%2B%20bW)%0A%20%20%20%20%20%20%20%20%7B%0A%20%20%20%20%20%20%20%20%20%20%20%20renderTexture(background%2C%20renderer%2C%20j%2C%20i)%3B%0A%20%20%20%20%20%20%20%20%7D%0A%20%20%20%20%7D%0A%20%20%20%20SDL_RenderPresent(renderer)%3B%0A%20%20%20%20SDL_Delay(2000)%3B” message=”” highlight=”” provider=”manual”/]

This excerpt does the following:

  • Clears the renderer
  • Instantiates the bW and bH variables
  • Checks the texture to see what it’s dimensions are
  • Enters a loop that iterates through a number of steps equal to the window height divided by the texture height
  • Enters a loop within the first loop that iterates through a number of steps equal to the window width divided by the texture width and deposits an instance of the texture at that location
  • Renders the scene to the window
  • Delays for 2 seconds so we can see the result

This allows me to use a tile of any size and the system will automatically tile it as many times as required to fill the window.


Section 3

In section 3, TwinkleBearDev introduces the SDL_image addon module that allows us to import images in most common formats, including PNG with transparency. With a few minor modifications to the loadTexture method we can now import PNG images!

Later on we overload the renderTexture method to allow for scaling by setting the width and height of the destination SDL_rect, this allowed for some more interesting behaviour for my tiling algorithm above. Now that we can specify an arbitrary scale, we’ll need to be able to take the scale into account. this is done by the following:

[pastacode lang=”cpp” manual=”%20%20%20%20int%20scaler%20%3D%203%3B%0A%0A%20%20%20%20int%20bW%2C%20bH%3B%0A%20%20%20%20SDL_QueryTexture(background%2CNULL%2CNULL%2C%26bW%2C%20%26bH)%3B%0A%20%20%20%20for%20(int%20i%20%3D%200%3B%20i%20%3C%20SCREEN_HEIGHT%3B%20i%20%3D%20i%20%2B%20bH%20%2F%20scaler)%0A%20%20%20%20%7B%0A%20%20%20%20%20%20%20%20for%20(int%20j%20%3D%200%3B%20j%20%3C%20SCREEN_WIDTH%3B%20j%20%3D%20j%20%2B%20bW%20%2F%20scaler)%0A%20%20%20%20%20%20%20%20%7B%0A%20%20%20%20%20%20%20%20%20%20%20%20renderTexture(background%2C%20renderer%2C%20j%2C%20i%2C%20bW%20%2F%20scaler%2C%20bH%20%2F%20scaler)%3B%0A%20%20%20%20%20%20%20%20%7D%0A%20%20%20%20%7D” message=”” highlight=”” provider=”manual”/]


As you can see, we’ve added a scaler variable that we can modify to set the scale of our tile and we’ve also modified the nested for loops to scale based on this value as well, the result is that no matter what the scale, the image tiles perfectly. It’s simple and purpose-built, but it serves as a good exercise.


Roger Roger, what’s our vector Victor?

After getting images on the screen I decided to start work on the vector class that will be the heart of the motion system that I plan on developing. To start, I had to learn the operations I wanted to perform: addition, subtraction, multiplication, getting the magnitude and normalization. The first three are very simple and the last two are related.

For addition and subtraction, it’s a simple matter of doing the basic operation on each of the components: given two vectors (x1,y1 and x2,y2) we would simply add x1 to x2 and y1 to y2.

For multiplication, we’re actually talking about scaling, we multiply the vector by a scaler by multiplying both it’s components by the scaler, preserving the direction but increasing the magnitude.

To get the magnitude of a vector, we treat it as a right triangle where x = a, y = b and we are solving for c, the hypotenuse. Using the Pythagorean theorem we know that a2 + b2 = c2 so if we take the square root of  a2 +b2 we get the magnitude.

For normalization, we get the magnitude and then divide each component of the vector by the magnitude, this gives us a unit vector, or a vector that retains it’s direction but has a magnitude of 1.

as a bonus, to set the magnitude, we can first normalize and then multiply by a scaler to get the magnitude we are looking for.

I implemented like this:

[pastacode lang=”cpp” manual=”class%20vec2%0A%7B%0A%20%20%20%20float%20x%3B%0A%20%20%20%20float%20y%3B%0A%0Apublic%3A%0A%20%20%20%20float%20getX()%20%7Breturn%20x%3B%7D%3B%0A%20%20%20%20float%20getY()%20%7Breturn%20y%3B%7D%3B%0A%20%20%20%20void%20setX(float%20i)%20%7Bx%20%3D%20i%20%3B%7D%3B%0A%20%20%20%20void%20setY(float%20i)%20%7By%20%3D%20i%20%3B%7D%3B%0A%0A%20%20%20%20void%20add(vec2%20vec)%3B%0A%20%20%20%20void%20mult(int%20scaler)%3B%0A%20%20%20%20void%20sub(vec2%20vec)%3B%0A%20%20%20%20float%20getMag()%20%7Breturn%20sqrt(%20(x*x)%20%2B%20(y*y)%20)%3B%7D%3B%0A%20%20%20%20void%20setMag(float%20mag)%3B%0A%20%20%20%20void%20normalize()%3B%0A%7D%3B%0A%0Avoid%20vec2%3A%3Aadd(vec2%20vec)%0A%7B%0A%20%20%20%20this-%3Ex%20%2B%3D%20vec.x%3B%0A%20%20%20%20this-%3Ey%20%2B%3D%20vec.y%3B%0A%0A%7D%0A%0Avoid%20vec2%3A%3Amult(int%20scaler)%0A%7B%0A%20%20%20%20this-%3Ex%20*%3D%20scaler%3B%0A%20%20%20%20this-%3Ey%20*%3D%20scaler%3B%0A%7D%0A%0Avoid%20vec2%3A%3Asub(vec2%20vec)%0A%7B%0A%20%20%20%20this-%3Ex%20-%3D%20vec.x%3B%0A%20%20%20%20this-%3Ey%20-%3D%20vec.y%3B%0A%7D%0A%0Avoid%20vec2%3A%3Anormalize()%0A%7B%0A%20%20%20%20float%20mag%20%3D%20this-%3EgetMag()%3B%0A%20%20%20%20this-%3Ex%20%3D%20this-%3Ex%20%2F%20mag%3B%0A%20%20%20%20this-%3Ey%20%3D%20this-%3Ey%20%2F%20mag%3B%0A%7D%0A%0Avoid%20vec2%3A%3AsetMag(float%20mag)%0A%7B%0A%20%20%20%20this-%3Enormalize()%3B%0A%20%20%20%20this-%3Emult(mag)%3B%0A%7D” message=”” highlight=”” provider=”manual”/]

I ran some test scenarios in the console and verified that my code is working as intended, with the vector class tested and working now, my next step will be extract it from the main.cpp and set it up into it’s own header and cpp files so I can include it without cluttering my main.cpp and after that I can get started on using it to implement some motion using a primitive rendering loop.
Getting things moving

I’ve been watching some videos by Daniel Shiffman on vectors and forces and I think that would something that would be fun to experiment with after getting images back on the screen with the refactored code. I think with what I’ve learned so far I should be able to implement a very simple physics system that should be fun and educational to play with.

In order to accomplish this I think I’ll need the following:

  • A vector class to describe a 2D point
  • Methods to interact with the vectors (add, subtract, multiply, get/set magnitude, etc)
  • A way to draw primitives on the screen, or continue using textures
  • Optionally setup an event handler to make it interactive

One aspect I think would be particularly interesting is collision detection using position vectors and based on a radius for each object. I believe that if I take the position vector of two objects, subtract them to get the vector between them and then compare the magnitude of the resultant vector to their combined radii, I should be able to determine if they’re touching. I won’t know for sure until I give it a try, hopefully I’ll get a chance to get started on this soon!

Cleaning up

Today I went through the code and completed turning the loose code in main into functions, and added a logging function to clean up the repetitious log code. Next time I’ll look into getting some images back on the screen and hopefully start working on moving things around on screen.

Getting started

The first step in any venture is to actually do something, you can sit around thinking about it forever and never actually get anything done, so that’s what I’m doing today.

I’ve been interested in programming and game development for a very long time, my father and I even made a game once in QBasic, it was simple, but it was fun. Sadly I was too young to really grasp what was happening with the code and so didn’t learn much from the experience. Years later I got some bad advice, I was told “You can’t be a programmer if you’re bad at math” which I was. This revelation was disheartening, but just like how our teachers were wrong about us not having calculators everywhere we went, thee were wrong about the math thing too. It turns out you can readily look up any math problem you don’t understand, provided you know what questions to ask. Someone much smarter than you has already solved the problem, whether it was Archimedes or Pythagoras that solved it is irrelevant, what matters is that you know enough to find the formula so you can enter it into the computer and have it do the math for you. It turns out that this is the key to programming in general, if you know what questions to ask, you can find the answers to the problem.

So programmers aren’t wise old wizards with all the answers readily at hand, they’re just really good problem solvers!


Today I aim to to answer the following questions:

  • How do I setup my IDE?
  • How do I setup a Github repo for my projects?
  • How do I get something on the screen?

In truth, I already know the answer to these questions… mostly. You see I have a tendency to get really wrapped up in programming, I eat, sleep and breathe code, I irritate all my friends and family by only being able to talk about one subject and then… I just kind of stop. Life gets busy, work gets busy, the days fly by and suddenly I haven’t touched my code in months and all that moment that had been building has been lost and I have to start over again.

Thankfully, I do manage to retain most of the knowledge, I just have to brush off the cobwebs and be reminded just how things work so I can get back into the swing of things. And that’s ultimately todays goal: get back into the swing of things. I’m hoping that by forcing myself to update this blog on each day of code, I can sort of motivate myself by requiring that I have something to report, we’ll see if this actually works out later on.

Now, onto some actual business!


Setting up the IDE

I’ll be using Code::Blocks as my IDE for all of these posts and I’ll be using SDL as my main library, I’m going to try to avoid using any other libraries for my projects and roll my own functions as often as possible, it’ll be a little harder, but I think the extra experience is probably valuable.

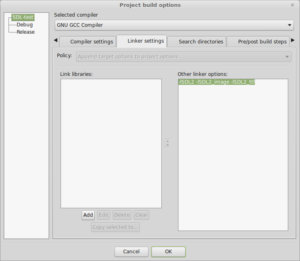
I downloaded SDL from the Ubuntu repos (I’m running Linux Mint 18), created a new project, and added -lSDL2 to the “Other Linker” field of the project Build options Linker tab.

Setting up the Github repo

I already have a github account github.com/atrixium, so this should be pretty straightforward. I logged into github and started a new project, and grabbed the HTTPS URL for the repo (https://github.com/Atrixium/CPP-Tutorial.git)

Now on my local machine I navigated to the folder I wanted to use for my local git repo, entered the command line and created the repo by executing git init.
Once that was done I ran git add to add all of the project files created above and then ran my first commit: git commit -m “initial commit”.

Now that the local repo was done, I had to link it to the remote repo, which is done by entering git remote add origin https://github.com/Atrixium/CPP-Tutorial.git.
I’m going to break that one down a bit because it’s a little confusing, git remote add is pretty self explanatory, but origin is a little confusing. Origin is just an alias used by git to refer to the remote repo, so basically instead of saying git push https://github.com/Atrixium/CPP-Tutorial.git master, we can say git push origin master which simply means “grab the current branch and push it to the remote master branch”. It seems arcane at first, but after a little analysis, it makes a lot of sense!

Pushing is the next thing to do, I’ve added my files, committed them and now I need to push them to my remote repo. git push origin master does the trick.

Now that I have my repos setup, it’s time to actually do some code and get something on the screen!

Getting  something on the screen

Now I need to look at the SDL documentation and work out how to get something on the screen, the SDL wiki is an excellent resource for information about the various API functions and it also has listed a number of helpful tutorials. I’ll be using TwinklebearDev as a reference.

As I go through I’m going to attempt to dissect the code that will be presented to see if I can build up a working knowledge of exactly what is happening,

The first thing I need to do is setup a basic program that includes the libraries I will be using, in this case, just SDL2, iostream and string.

[pastacode lang=”cpp” manual=”%23include%20%3CSDL2%2FSDL.h%3E%0A%23include%20%3Ciostream%3E%0A%23include%20%3Cstring%3E%0A%0Aint%20main(int%20argc%2C%20char%20**argv)%0A%7B%0A%20%20%20%20std%3A%3Acout%20%3C%3C%20%22Hello%20World!%22%3B%0A%0A%20%20%20%20return%200%3B%0A%7D%0A” message=”” highlight=”” provider=”manual”/]

It’s important to note the unusual looking int main(int argc, char **argv) is what allows the program to accept command line arguments, I’ll be looking into this in more detail later on.
Now I need to initialize SDL:

[pastacode lang=”cpp” manual=”%20%20%20%20if%20(SDL_Init(SDL_INIT_VIDEO)%20!%3D0)%0A%20%20%20%20%7B%0A%20%20%20%20%20%20%20%20std%3A%3Acout%20%3C%3C%20%22SDL%20Init%20error%3A%20%22%20%3C%3C%20SDL_GetError()%20%3C%3C%20std%3A%3Aendl%3B%0A%20%20%20%20%20%20%20%20return%201%3B%0A%20%20%20%20%7D” message=”” highlight=”” provider=”manual”/]

This attempts to init SDL, if it fails, it prints out any error messages retrieved from SDL_GetError() and then exits the program with a 1 error code.

Now that I have that working let’s move on to opening a window.

[pastacode lang=”cpp” manual=”%20%20%20%20SDL_Window%20*window%20%3D%20SDL_CreateWindow(%22Hello%20World%22%2C%20100%2C%20100%2C%20640%2C%20480%2C%20SDL_WINDOW_SHOWN)%3B%0A%20%20%20%20if%20(window%20%3D%3D%20nullptr)%0A%20%20%20%20%7B%0A%20%20%20%20%20%20%20%20std%3A%3Acout%20%3C%3C%20%22SDL_CreateWindow%20error%3A%20%22%20%3C%3C%20SDL_GetError()%20%3C%3C%20std%3A%3Aendl%3B%0A%20%20%20%20%20%20%20%20SDL_Quit()%3B%0A%20%20%20%20%20%20%20%20return%201%3B%0A%20%20%20%20%7D” message=”” highlight=”” provider=”manual”/]

This is a bit more complicated, we create a pointer called window and then fill it with the result of SDL_CreateWindow, which creates a window titled Hello World at 100,100 and 640 wide by 480 high on the screen, makes it visible and then carries on with the program. The window closes immediately as the program ends.

Now we need to create a renderer to draw to the window we just created.

[pastacode lang=”cpp” manual=”%20%20%20%20SDL_Renderer%20*renderer%20%3D%20SDL_CreateRenderer(window%2C%20-1%2C%20SDL_RENDERER_ACCELERATED%20%7C%20SDL_RENDERER_PRESENTVSYNC)%3B%0A%20%20%20%20if%20(renderer%20%3D%3D%20nullptr)%0A%20%20%20%20%7B%0A%20%20%20%20%20%20%20%20SDL_DestroyWindow(window)%3B%0A%20%20%20%20%20%20%20%20std%3A%3Acout%20%3C%3C%20%22SDL_CreateRenderer%20error%3A%20%22%20%3C%3C%20SDL_GetError()%20%3C%3C%20std%3A%3Aendl%3B%0A%20%20%20%20%20%20%20%20SDL_Quit()%3B%0A%20%20%20%20%20%20%20%20return%201%3B%0A%20%20%20%20%7D” message=”” highlight=”” provider=”manual”/]

Now I want to load a BMP so we can get it displayed in the window.

[pastacode lang=”cpp” manual=”%20%20%20%20std%3A%3Astring%20imagePath%20%3D%20%22Images%2FAtrixium.bmp%22%3B%0A%20%20%20%20SDL_Surface%20*bmp%20%3D%20SDL_LoadBMP(imagePath.c_str())%3B%0A%20%20%20%20if%20(bmp%20%3D%3D%20nullptr)%0A%20%20%20%20%7B%0A%20%20%20%20%20%20%20%20SDL_DestroyRenderer(renderer)%3B%0A%20%20%20%20%20%20%20%20SDL_DestroyWindow(window)%3B%0A%20%20%20%20%20%20%20%20std%3A%3Acout%20%3C%3C%20%22SDL_LoadBMP%20error%3A%20%22%20%3C%3C%20SDL_GetError()%20%3C%3C%20std%3A%3Aendl%3B%0A%20%20%20%20%20%20%20%20SDL_Quit()%3B%0A%20%20%20%20%20%20%20%20return%201%3B%0A%20%20%20%20%7D” message=”” highlight=”” provider=”manual”/]

This will take a path to a BMP as a string, load the BMP into memory, and provide an SDL_Surface pointer that we can use to display the BMP.

Now, rather than just display the BMP as an SDL_Surface which is done in software mode, we will transfer it to an SDL_Texture so we can use the accelerated renderer we created earlier.

[pastacode lang=”cpp” manual=”%20%20%20%20SDL_Texture%20*texture%20%3D%20SDL_CreateTextureFromSurface(renderer%2C%20bmp)%3B%0A%20%20%20%20SDL_FreeSurface(bmp)%3B%0A%20%20%20%20if%20(texture%20%3D%3D%20nullptr)%0A%20%20%20%20%7B%0A%20%20%20%20%20%20%20%20SDL_DestroyRenderer(renderer)%3B%0A%20%20%20%20%20%20%20%20SDL_DestroyWindow(window)%3B%0A%20%20%20%20%20%20%20%20std%3A%3Acout%20%3C%3C%20%22SDL_CreateTextureFromSurface%20error%3A%20%22%20%3C%3C%20SDL_GetError()%20%3C%3C%20std%3A%3Aendl%3B%0A%20%20%20%20%20%20%20%20SDL_Quit()%3B%0A%20%20%20%20%20%20%20%20return%201%3B%0A%20%20%20%20%7D” message=”” highlight=”” provider=”manual”/]

Once we have created the texture from the surface it has served it’s purpose and we should now free it.

Now we just need to display the image on the window, clean up and close SDL!

[pastacode lang=”cpp” manual=”%20%20%20%20SDL_RenderClear(renderer)%3B%0A%20%20%20%20SDL_RenderCopy(renderer%2C%20texture%2C%20NULL%2C%20NULL)%3B%0A%20%20%20%20SDL_RenderPresent(renderer)%3B%0A%20%20%20%20SDL_Delay(3000)%3B%0A%20%20%20%20%0A%20%20%20%20SDL_DestroyTexture(texture)%3B%0A%20%20%20%20SDL_DestroyWindow(window)%3B%0A%20%20%20%20SDL_DestroyRenderer(renderer)%3B%0A%20%20%20%20SDL_Quit()%3B” message=”” highlight=”” provider=”manual”/]

This will:

  • Clear the renderer
  • Copy the texture to the rendering target
  • Update the screen with the renderer
  • Delay for 3 seconds
  • Cleanup the items we created
  • Quit SDL


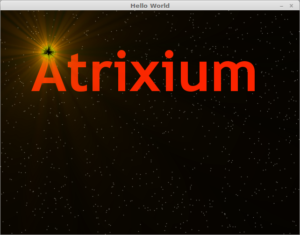
And after all that, this is what we get!


A quick commit and push of our code in git and we’re all done for today!


Summary


What we’ve learned here today is the basic underpinnings of how SDL works to get data to the screen, the process appears to be:

  • Initialize the SDL video module
  • Create a window
  • Create a renderer within that window
  • Create an SDL_Surface
  • Use the SDL_Surface to create an SDL_Texture and free the SDL_Surface
  • Clear the renderer
  • Copy the texture to the renderer
  • have the renderer update the window

This process is the basic boilerplate that we need to get graphics on the screen and so is our gateway into graphical games!

I decided to start a blog…

So that’s what this is, the blog. My goal here is to chronicle my various (mis)adventures with coding, electronics, machining and any of the other strange things I get up to that normal people rarely even think about. I’m hopeful that this blog will help me track my own thoughts as well as give me a way to look back on my past performance see my improvement in a less subjective way. If I manage to help someone else out along the way, awesome!