A while back I was mulling over the idea of a laser engraved PCB etching process and I found a 2.5 Watt cutting laser diode on sale for cheap on Banggood and decided to go for it, many months later I finally managed to get around to testing it and the laser works great! I decided that the obvious thing to do with the laser would be to attach it to my 3D printer as a removable module so that I could have 3D printing and laser cutting/engraving all in one machine instead of having to build another motion platform.
The 3D printer I’m using is a heavily modified Geeetech i3 Pro C kit that I assembled a few years ago, since getting the kit I have upgraded the hotend to an E3D V6 using this extruder assembly. The extruder works great and best of all it has lots of attachment points built in, which made adapting the laser very simple.
I made up a bracket in OnShape to mount the laser to the front of the extruder, printed it and bolted it on and slid the laser into the mount. I added a connector to the wiring of my layer cooling fan and added a mating connector to the laser so that I could use the fan PWM (which I recently upgraded to a 5A MOSFET) to control the laser.
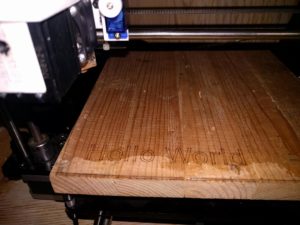
I donned my laser goggles and turned the laser up to 30% power, focused the beam as close to perfect as I could by eye and started checking the new zero point I would have to use for the laser. With my new zero point determined, I started looking into my laser etching process, the first test was a simple “Hello World” engraving into a piece of wood to verify my settings and focal point. I used Inkscape with the J Tech Photonics plugin and it worked great with no issues, it’s a great plugin for outlining vector shapes!
With the first test completed, I decided to look into the PCB etching process, the usual way that this is done is to paint the board with a light coat of matte black paint, take the board layout from the CAD software, generate an image of the paths, make it a black and white negative, raster burn that onto the board and then etch the result, this works, but it’s not very precise and it’s not very fast, the laser ends up doing a lot of extra moves and diagonal lines tend to end up with a lot of aliasing.
To get around these issues, I decided to take my board design from Eagle, run it through the isolation milling plugin PCB-GCODE, modify the resulting gcode to replace all spindle motion in the z axis with laser on/off commands and then go through the normal process of paint, engrave and etch.
Setting up PCB-GCODE was fairly straightforward, I just setup the machine settings to match my 3D printers capabilities, set the cutter diameter to the approximate laser spot size, set the isolation step to half of the spot size and set the Z up and Down parameters to 0 and 1 so I could easily parse them later with a script. I ran the resulting gcode through NC Viewer to validate the tool paths and kept tweaking the machine settings until I was satisfied with what I was seeing in the simulation, at this point it was on to scripting.
I decided to use Python to do the processing for no other reason than I hadn’t done any Python scripting before and I wanted to give it a try. I was able to find some simple example code that showed how to find and replace data in a file and modified that to take in the gcode file and replace and remove the elements I needed to change, in this case:
G00 Z0.0000 became M106 S255
G01 Z1.0000 F6000.00 became M107
M02, M03 and M05 were removed
and the following code was injected after the last comment in the file header to home the axes and set the new zero location for the file to start at:
G28 ;Home all axes
G0 X0 Y46 Z47.5 ;Move to laser Zero position
G92 X0 Y0 Z0 ;Zero X,Y and Z
After all this I have a basic tool chain assembled for the PCB laser etch process, the only things left to do are to do a few test runs on paper to validate the beam width settings, do some tests on painted copper to determine the necessary cut speed for ablating the paint and then try it on a real board to see what kind of results can be had! So far, it looks promising and should be much faster and more precise than raster engraving, it’s also worth mentioning that it should use far less etching chemicals than the conventional methods! of course in order to continue I will need to hook up a fan to clear the smoke away from the laser and figure out a ventilation system to vent the fumes outdoors rather than into my office, but we’ll get their in time.
