Linux Mint Screen Tearing with Mate and Nvidia

Recently I switched over to using Mate as my window manager due to some lag issues with Cinnamon and I’ve been having issues with screen tearing since the switch, the vsync setting in the Nvidia control panel doesn’t appear to help. I found an interesting solution on CMSCritic.com that showed how to correct this, and testing showed that it worked, but only for one monitor. Problematically, I have three monitors, so I had to take apart this command they used and see if I could rearrange it to work with my setup.

The original command they suggested was:

nvidia-settings –assign CurrentMetaMode=”nvidia-auto-select +0+0 { ForceCompositionPipeline = On }”


Doing this turned off my other two monitors but did take care of the screen tearing on the remaining monitor, so I went into the Nvidia control panel, generated an xorg.conf file and inspected the settings there, I found this line:

Option         “metamodes” “HDMI-0: nvidia-auto-select +0+72, DVI-D-0: nvidia-auto-select +1920+0, DVI-I-0: nvidia-auto-select +3968+72″


This looks very familiar, so by taking the information in that line and rearranging it into the command before we get:

nvidia-settings –assign CurrentMetaMode=”HDMI-0: nvidia-auto-select +0+72, DVI-D-0: nvidia-auto-select +1920+0, DVI-I-0: nvidia-auto-select +3968+72 { ForceCompositionPipeline = On }”


Nothing appeared to change at first when I ran this, but it did solve the screen tearing problem, but only on the third monitor! So what we learned here is that the ForceCompositionPipeline command is display independent. I rearranged the command one more time and came up with this:

nvidia-settings –assign CurrentMetaMode=”HDMI-0: nvidia-auto-select +0+72, DVI-D-0: nvidia-auto-select +1920+0 { ForceCompositionPipeline = On }, DVI-I-0: nvidia-auto-select +3968+72″


This runs that command against only my center monitor, which is my primary. After testing the command by running Deus Ex: Mankind Divided, I determined there there is no performance impact from enabling this command, which is excellent news! I modified the command one last time to apply the affect to all of my monitors:

nvidia-settings –assign CurrentMetaMode=”HDMI-0: nvidia-auto-select +0+72 { ForceCompositionPipeline = On }, DVI-D-0: nvidia-auto-select +1920+0 { ForceCompositionPipeline = On }, DVI-I-0: nvidia-auto-select +3968+72 { ForceCompositionPipeline = On }”


I tested again with Deus Ex: Mankind Divided, and again determined that there was no impact on frame rate so now I can integrate this with my xorg.conf and enjoy my system without having to endure terrible screen tearing!
Game Design

Now is a good time to start thinking about the nuts and bolts of our game and how we’re going to make it all work. We can think of our game as a series of things with “is a” and “has a” relationships, we’ll probably want something like this:

  • A Game class that has:
    • A game state enum
    • A method for changing game states
    • A method for restarting the game
    • A Ball class
    • A Player class
    • A playing field or level
    • A win condition that ends the game
  • Ball class that has:
    • An X,Y position
    • An X,Y velocity
    • An image
    • A method for Collision Detection
  • A Player class that has:
    • A score
    • An SDL_Rect
    • A method for getting points

We can start building out our classes and adding functionality as we go. We’ll ignore the state machine that we implemented earlier so that we can focus on getting stuff on the screen, once we have stuff on the screen we can worry about states and what they will do.

The Player class is a good place to start since it’s very simple and will allow us to get something on the screen. An SDL_Rect has a height and width as well as an x,y position, so adding the SDL_Rect means we don’t need a separate set of position variables, we can just use those. So far our player class looks like this:

[pastacode lang=”cpp” manual=”%23ifndef%20PLAYER_H%0A%23define%20PLAYER_H%0A%0A%23include%20%3CSDL2%2FSDL.h%3E%0A%0Aclass%20Player%0A%7B%0A%20%20%20%20public%3A%0A%20%20%20%20%20%20%20%20Player()%3B%0A%0A%20%20%20%20%20%20%20%20void%20AddScore(int)%3B%0A%20%20%20%20%20%20%20%20int%20GetScore()%7Breturn%20score%3B%7D%3B%0A%20%20%20%20%20%20%20%20void%20Update()%3B%0A%20%20%20%20%20%20%20%20SDL_Rect*%20GetPaddle()%7Breturn%20%26paddle%3B%7D%3B%0A%0A%20%20%20%20private%3A%0A%20%20%20%20%20%20%20%20int%20score%3B%0A%20%20%20%20%20%20%20%20SDL_Rect%20paddle%3B%0A%0A%7D%3B%0A%0A%23endif%20%2F%2F%20PLAYER_H%0A” message=”Player.h” highlight=”” provider=”manual”/]

[pastacode lang=”cpp” manual=”%23include%20%22player.h%22%0A%0APlayer%3A%3APlayer()%0A%7B%0A%20%20%20%20%20%20%20%20score%20%3D%200%3B%0A%20%20%20%20%20%20%20%20paddle.x%20%3D%200%3B%0A%20%20%20%20%20%20%20%20paddle.y%20%3D%200%3B%0A%20%20%20%20%20%20%20%20paddle.h%20%3D%20100%3B%0A%20%20%20%20%20%20%20%20paddle.w%20%3D%2015%3B%0A%7D%0A%0Avoid%20Player%3A%3AAddScore(int%20s)%0A%7B%0A%20%20%20%20score%20%2B%3D%20s%3B%0A%7D%0A%0Avoid%20Player%3A%3AUpdate()%0A%7B%0A%0A%7D%0A” message=”” highlight=”” provider=”manual”/]

We can make the player paddle object show up by instantiating a Player object called P1 and adding the following to the render sequence:

[pastacode lang=”cpp” manual=”SDL_SetRenderDrawColor(renderer%2C%200%2C%200%2C%200%2C%20255)%3B%0ASDL_RenderClear(renderer)%3B%0ASDL_SetRenderDrawColor(renderer%2C%20255%2C%200%2C%200%2C%20255)%3B%0ASDL_RenderFillRect(renderer%2C%20P1.GetPaddle())%3B%0ASDL_RenderPresent(renderer)%3B” message=”” highlight=”” provider=”manual”/]

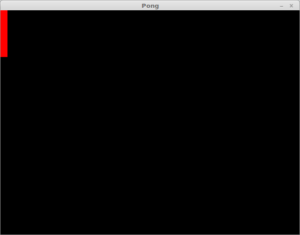
And with that we get this:

Not terribly exciting yet, but this is a start! It’s a simple matter now to instantiate another player and add the ball class, after that we are into game logic and we’re basically done! We’ll get more done on the next entry!