The first step in any venture is to actually do something, you can sit around thinking about it forever and never actually get anything done, so that’s what I’m doing today.
I’ve been interested in programming and game development for a very long time, my father and I even made a game once in QBasic, it was simple, but it was fun. Sadly I was too young to really grasp what was happening with the code and so didn’t learn much from the experience. Years later I got some bad advice, I was told “You can’t be a programmer if you’re bad at math” which I was. This revelation was disheartening, but just like how our teachers were wrong about us not having calculators everywhere we went, thee were wrong about the math thing too. It turns out you can readily look up any math problem you don’t understand, provided you know what questions to ask. Someone much smarter than you has already solved the problem, whether it was Archimedes or Pythagoras that solved it is irrelevant, what matters is that you know enough to find the formula so you can enter it into the computer and have it do the math for you. It turns out that this is the key to programming in general, if you know what questions to ask, you can find the answers to the problem.
So programmers aren’t wise old wizards with all the answers readily at hand, they’re just really good problem solvers!
Today I aim to to answer the following questions:
- How do I setup my IDE?
- How do I setup a Github repo for my projects?
- How do I get something on the screen?
In truth, I already know the answer to these questions… mostly. You see I have a tendency to get really wrapped up in programming, I eat, sleep and breathe code, I irritate all my friends and family by only being able to talk about one subject and then… I just kind of stop. Life gets busy, work gets busy, the days fly by and suddenly I haven’t touched my code in months and all that moment that had been building has been lost and I have to start over again.
Thankfully, I do manage to retain most of the knowledge, I just have to brush off the cobwebs and be reminded just how things work so I can get back into the swing of things. And that’s ultimately todays goal: get back into the swing of things. I’m hoping that by forcing myself to update this blog on each day of code, I can sort of motivate myself by requiring that I have something to report, we’ll see if this actually works out later on.
Now, onto some actual business!
Setting up the IDE
I’ll be using Code::Blocks as my IDE for all of these posts and I’ll be using SDL as my main library, I’m going to try to avoid using any other libraries for my projects and roll my own functions as often as possible, it’ll be a little harder, but I think the extra experience is probably valuable.
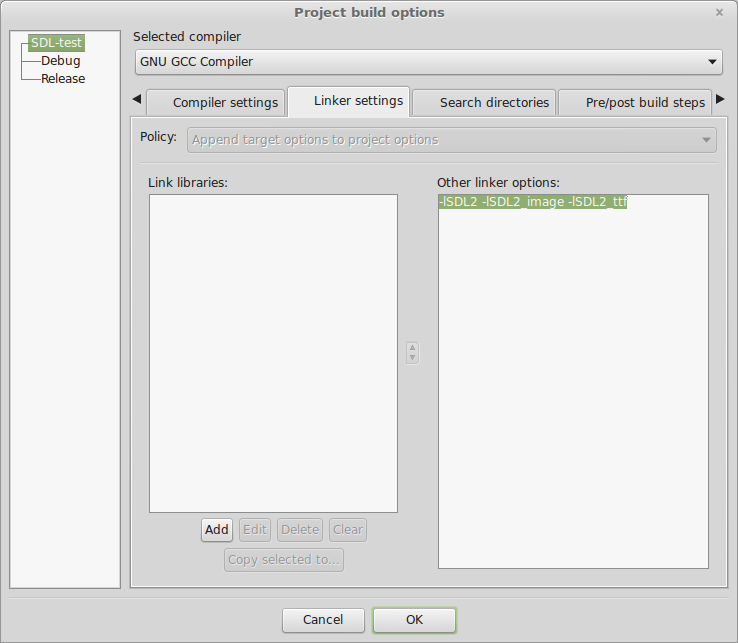
I downloaded SDL from the Ubuntu repos (I’m running Linux Mint 18), created a new project, and added -lSDL2 to the “Other Linker” field of the project Build options Linker tab.
Setting up the Github repo
I already have a github account github.com/atrixium, so this should be pretty straightforward. I logged into github and started a new project, and grabbed the HTTPS URL for the repo (https://github.com/Atrixium/CPP-Tutorial.git)
Now on my local machine I navigated to the folder I wanted to use for my local git repo, entered the command line and created the repo by executing git init.
Once that was done I ran git add to add all of the project files created above and then ran my first commit: git commit -m “initial commit”.
Now that the local repo was done, I had to link it to the remote repo, which is done by entering git remote add origin https://github.com/Atrixium/CPP-Tutorial.git.
I’m going to break that one down a bit because it’s a little confusing, git remote add is pretty self explanatory, but origin is a little confusing. Origin is just an alias used by git to refer to the remote repo, so basically instead of saying git push https://github.com/Atrixium/CPP-Tutorial.git master, we can say git push origin master which simply means “grab the current branch and push it to the remote master branch”. It seems arcane at first, but after a little analysis, it makes a lot of sense!
Pushing is the next thing to do, I’ve added my files, committed them and now I need to push them to my remote repo. git push origin master does the trick.
Now that I have my repos setup, it’s time to actually do some code and get something on the screen!
Getting something on the screen
Now I need to look at the SDL documentation and work out how to get something on the screen, the SDL wiki is an excellent resource for information about the various API functions and it also has listed a number of helpful tutorials. I’ll be using TwinklebearDev as a reference.
As I go through I’m going to attempt to dissect the code that will be presented to see if I can build up a working knowledge of exactly what is happening,
The first thing I need to do is setup a basic program that includes the libraries I will be using, in this case, just SDL2, iostream and string.
[pastacode lang=”cpp” manual=”%23include%20%3CSDL2%2FSDL.h%3E%0A%23include%20%3Ciostream%3E%0A%23include%20%3Cstring%3E%0A%0Aint%20main(int%20argc%2C%20char%20**argv)%0A%7B%0A%20%20%20%20std%3A%3Acout%20%3C%3C%20%22Hello%20World!%22%3B%0A%0A%20%20%20%20return%200%3B%0A%7D%0A” message=”” highlight=”” provider=”manual”/]
It’s important to note the unusual looking int main(int argc, char **argv) is what allows the program to accept command line arguments, I’ll be looking into this in more detail later on.
Now I need to initialize SDL:
[pastacode lang=”cpp” manual=”%20%20%20%20if%20(SDL_Init(SDL_INIT_VIDEO)%20!%3D0)%0A%20%20%20%20%7B%0A%20%20%20%20%20%20%20%20std%3A%3Acout%20%3C%3C%20%22SDL%20Init%20error%3A%20%22%20%3C%3C%20SDL_GetError()%20%3C%3C%20std%3A%3Aendl%3B%0A%20%20%20%20%20%20%20%20return%201%3B%0A%20%20%20%20%7D” message=”” highlight=”” provider=”manual”/]
This attempts to init SDL, if it fails, it prints out any error messages retrieved from SDL_GetError() and then exits the program with a 1 error code.
Now that I have that working let’s move on to opening a window.
[pastacode lang=”cpp” manual=”%20%20%20%20SDL_Window%20*window%20%3D%20SDL_CreateWindow(%22Hello%20World%22%2C%20100%2C%20100%2C%20640%2C%20480%2C%20SDL_WINDOW_SHOWN)%3B%0A%20%20%20%20if%20(window%20%3D%3D%20nullptr)%0A%20%20%20%20%7B%0A%20%20%20%20%20%20%20%20std%3A%3Acout%20%3C%3C%20%22SDL_CreateWindow%20error%3A%20%22%20%3C%3C%20SDL_GetError()%20%3C%3C%20std%3A%3Aendl%3B%0A%20%20%20%20%20%20%20%20SDL_Quit()%3B%0A%20%20%20%20%20%20%20%20return%201%3B%0A%20%20%20%20%7D” message=”” highlight=”” provider=”manual”/]
This is a bit more complicated, we create a pointer called window and then fill it with the result of SDL_CreateWindow, which creates a window titled Hello World at 100,100 and 640 wide by 480 high on the screen, makes it visible and then carries on with the program. The window closes immediately as the program ends.
Now we need to create a renderer to draw to the window we just created.
[pastacode lang=”cpp” manual=”%20%20%20%20SDL_Renderer%20*renderer%20%3D%20SDL_CreateRenderer(window%2C%20-1%2C%20SDL_RENDERER_ACCELERATED%20%7C%20SDL_RENDERER_PRESENTVSYNC)%3B%0A%20%20%20%20if%20(renderer%20%3D%3D%20nullptr)%0A%20%20%20%20%7B%0A%20%20%20%20%20%20%20%20SDL_DestroyWindow(window)%3B%0A%20%20%20%20%20%20%20%20std%3A%3Acout%20%3C%3C%20%22SDL_CreateRenderer%20error%3A%20%22%20%3C%3C%20SDL_GetError()%20%3C%3C%20std%3A%3Aendl%3B%0A%20%20%20%20%20%20%20%20SDL_Quit()%3B%0A%20%20%20%20%20%20%20%20return%201%3B%0A%20%20%20%20%7D” message=”” highlight=”” provider=”manual”/]
Now I want to load a BMP so we can get it displayed in the window.
[pastacode lang=”cpp” manual=”%20%20%20%20std%3A%3Astring%20imagePath%20%3D%20%22Images%2FAtrixium.bmp%22%3B%0A%20%20%20%20SDL_Surface%20*bmp%20%3D%20SDL_LoadBMP(imagePath.c_str())%3B%0A%20%20%20%20if%20(bmp%20%3D%3D%20nullptr)%0A%20%20%20%20%7B%0A%20%20%20%20%20%20%20%20SDL_DestroyRenderer(renderer)%3B%0A%20%20%20%20%20%20%20%20SDL_DestroyWindow(window)%3B%0A%20%20%20%20%20%20%20%20std%3A%3Acout%20%3C%3C%20%22SDL_LoadBMP%20error%3A%20%22%20%3C%3C%20SDL_GetError()%20%3C%3C%20std%3A%3Aendl%3B%0A%20%20%20%20%20%20%20%20SDL_Quit()%3B%0A%20%20%20%20%20%20%20%20return%201%3B%0A%20%20%20%20%7D” message=”” highlight=”” provider=”manual”/]
This will take a path to a BMP as a string, load the BMP into memory, and provide an SDL_Surface pointer that we can use to display the BMP.
Now, rather than just display the BMP as an SDL_Surface which is done in software mode, we will transfer it to an SDL_Texture so we can use the accelerated renderer we created earlier.
[pastacode lang=”cpp” manual=”%20%20%20%20SDL_Texture%20*texture%20%3D%20SDL_CreateTextureFromSurface(renderer%2C%20bmp)%3B%0A%20%20%20%20SDL_FreeSurface(bmp)%3B%0A%20%20%20%20if%20(texture%20%3D%3D%20nullptr)%0A%20%20%20%20%7B%0A%20%20%20%20%20%20%20%20SDL_DestroyRenderer(renderer)%3B%0A%20%20%20%20%20%20%20%20SDL_DestroyWindow(window)%3B%0A%20%20%20%20%20%20%20%20std%3A%3Acout%20%3C%3C%20%22SDL_CreateTextureFromSurface%20error%3A%20%22%20%3C%3C%20SDL_GetError()%20%3C%3C%20std%3A%3Aendl%3B%0A%20%20%20%20%20%20%20%20SDL_Quit()%3B%0A%20%20%20%20%20%20%20%20return%201%3B%0A%20%20%20%20%7D” message=”” highlight=”” provider=”manual”/]
Once we have created the texture from the surface it has served it’s purpose and we should now free it.
Now we just need to display the image on the window, clean up and close SDL!
[pastacode lang=”cpp” manual=”%20%20%20%20SDL_RenderClear(renderer)%3B%0A%20%20%20%20SDL_RenderCopy(renderer%2C%20texture%2C%20NULL%2C%20NULL)%3B%0A%20%20%20%20SDL_RenderPresent(renderer)%3B%0A%20%20%20%20SDL_Delay(3000)%3B%0A%20%20%20%20%0A%20%20%20%20SDL_DestroyTexture(texture)%3B%0A%20%20%20%20SDL_DestroyWindow(window)%3B%0A%20%20%20%20SDL_DestroyRenderer(renderer)%3B%0A%20%20%20%20SDL_Quit()%3B” message=”” highlight=”” provider=”manual”/]
This will:
- Clear the renderer
- Copy the texture to the rendering target
- Update the screen with the renderer
- Delay for 3 seconds
- Cleanup the items we created
- Quit SDL
And after all that, this is what we get!
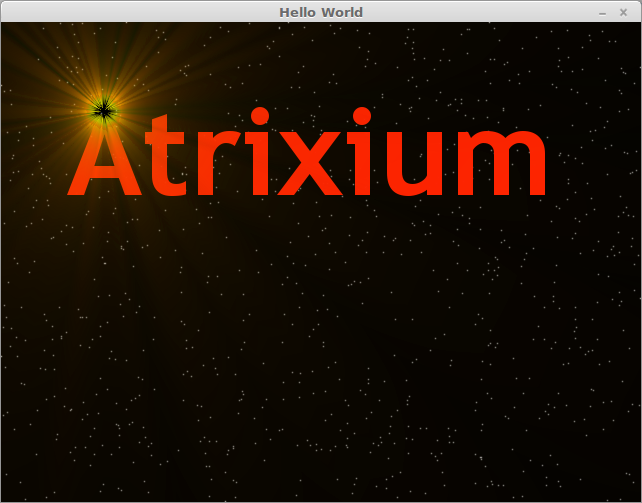
A quick commit and push of our code in git and we’re all done for today!
Summary
What we’ve learned here today is the basic underpinnings of how SDL works to get data to the screen, the process appears to be:
- Initialize the SDL video module
- Create a window
- Create a renderer within that window
- Create an SDL_Surface
- Use the SDL_Surface to create an SDL_Texture and free the SDL_Surface
- Clear the renderer
- Copy the texture to the renderer
- have the renderer update the window
This process is the basic boilerplate that we need to get graphics on the screen and so is our gateway into graphical games!